Synthio Tutorial: 1. Getting Started
- Wiring up
- Code setup
- Make a Sound: Hello boop!
- Hello Boop reorganized and with buffer
- Fun with boops
- Controlling Notes
- Next steps
Wiring up
The examples in this tutorial will use the following components:
- 1 x Raspberry Pi Pico RP2040 or compatible (e.g. PicoH, Pico and solder your own headers)
- 1 x PCM5102 I2S DAC module or similar (example, adafruit)
- 2 x 10k 9mm potentiometers (example, 5k or 20k will also work)
- 1+ x 6mm tact switch buttons (breadboard-friendly versions)
But these examples will work with just about any board/chip that has
CircuitPython synthio supports and some sort of audio output,
like a QTPy RP2040 with PWM output.
Most of the examples do not require the pots or buttons, but they will form the main interactivity for the examples.
For the USB MIDI examples, you should have an app on your computer that can generate MIDI. For the Mac, the free MIDIKeys app is great. For Windows/Linux/Mac, there’s the free VPMK. If you have a DAW program on your computer like Ableton Live, Garageband, Reaper, or Traktion, those can also generate MIDI as well as forward MIDI from a MIDI keyboard, if you have that.
You will also need a powered speaker (or headphones in a pinch) to hear the synth.
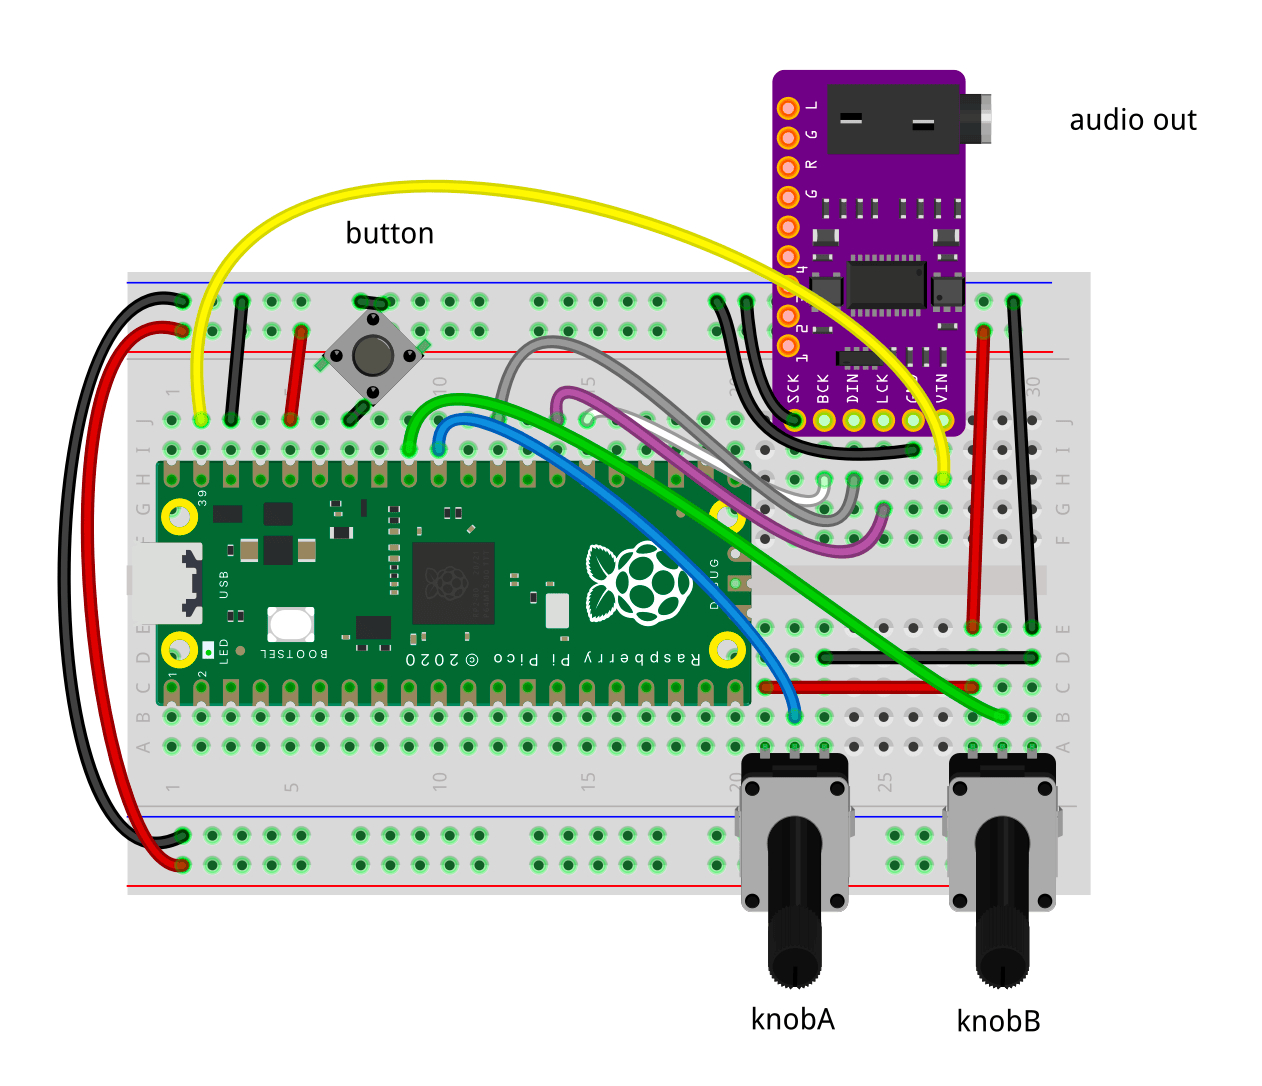
With a breadboard
A quick way of assembling the above components is with a solderless breadboard. And even though the wiring up connections between modules is solderless, you still need to solder header pins to the Pico module and PCM5102 module. This soldering is pretty quick and if you’ve not done it before, it’s a good way to learn soldering.
Breadboarding circuits is a great way to get started, but breadboard connections can become intermittent, making them frustrating.
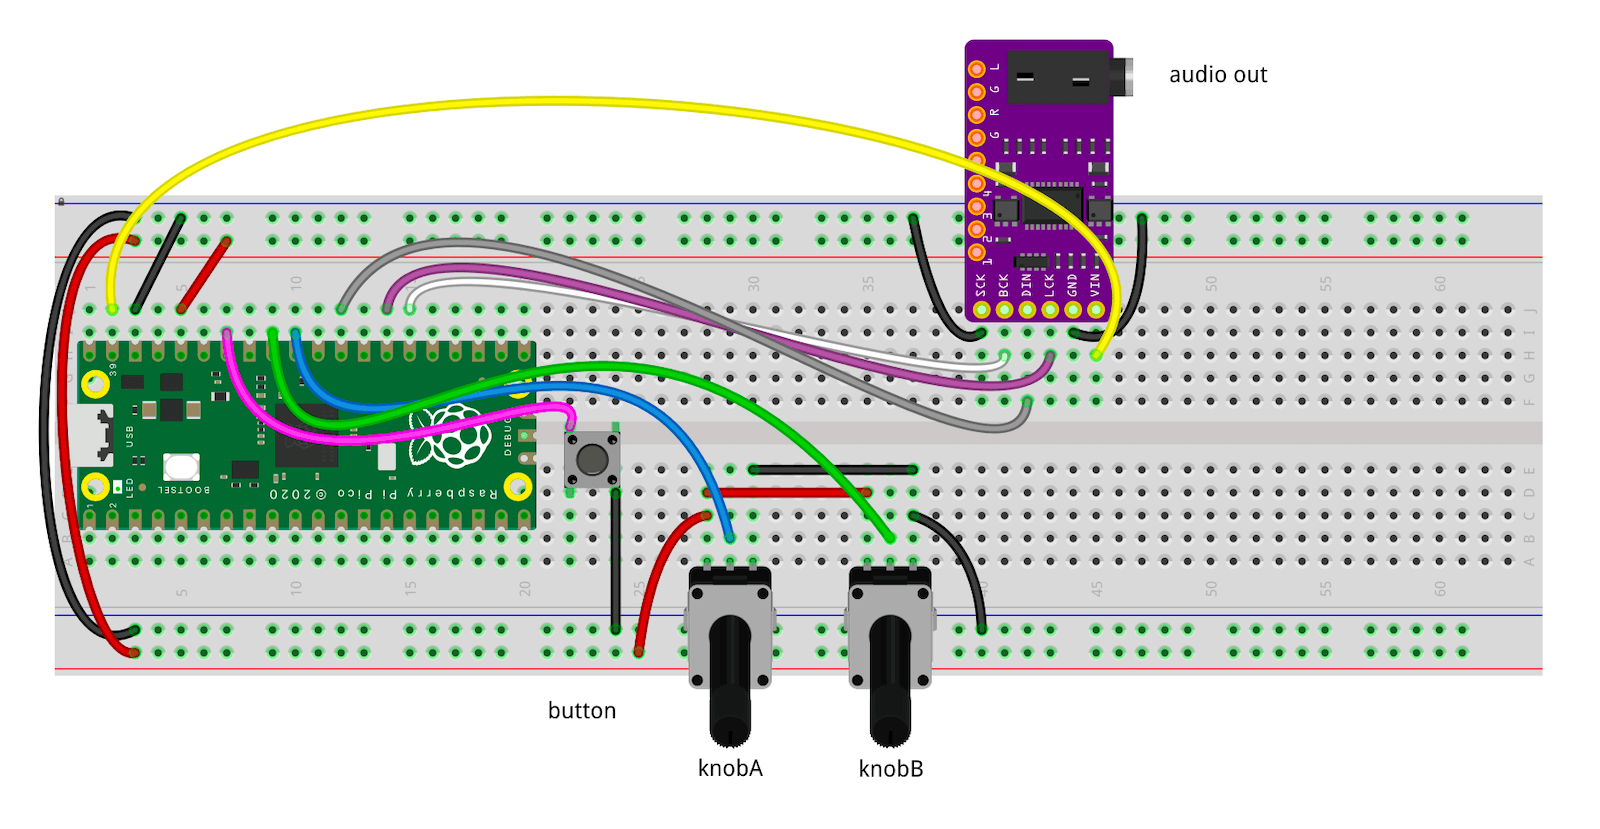
Fitting that all on a half-sized breadboard is cramped, here’s how you might wire it up on a full-sized breadboard:
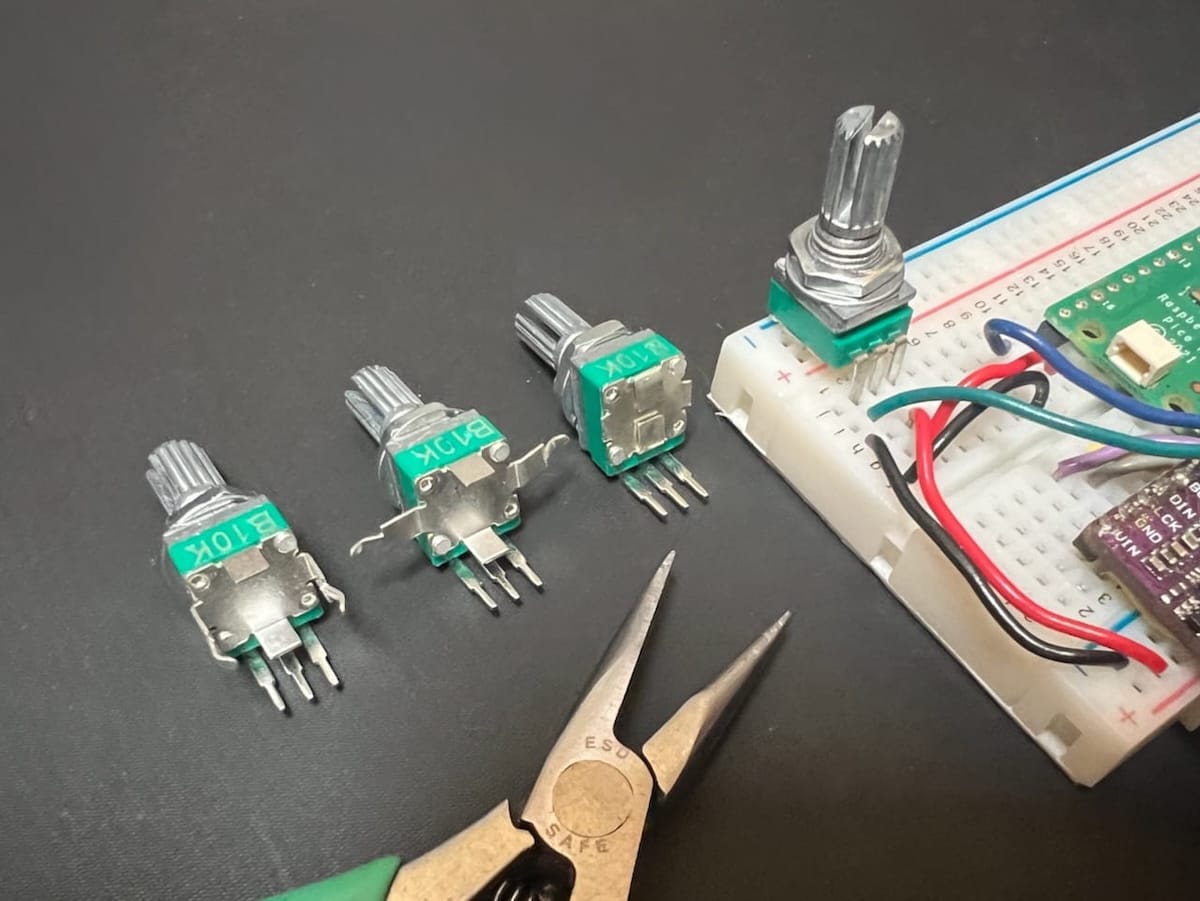
Modifying pots for breadboard use
Potentiometers have two features that make them hard to use in breadboards: mounting lugs and stand-offs. Fortunately, these are easily bent or cut to allow the pot to plug into the breadboard better. Here’s how I bend the lugs and stand-offs on these pots:
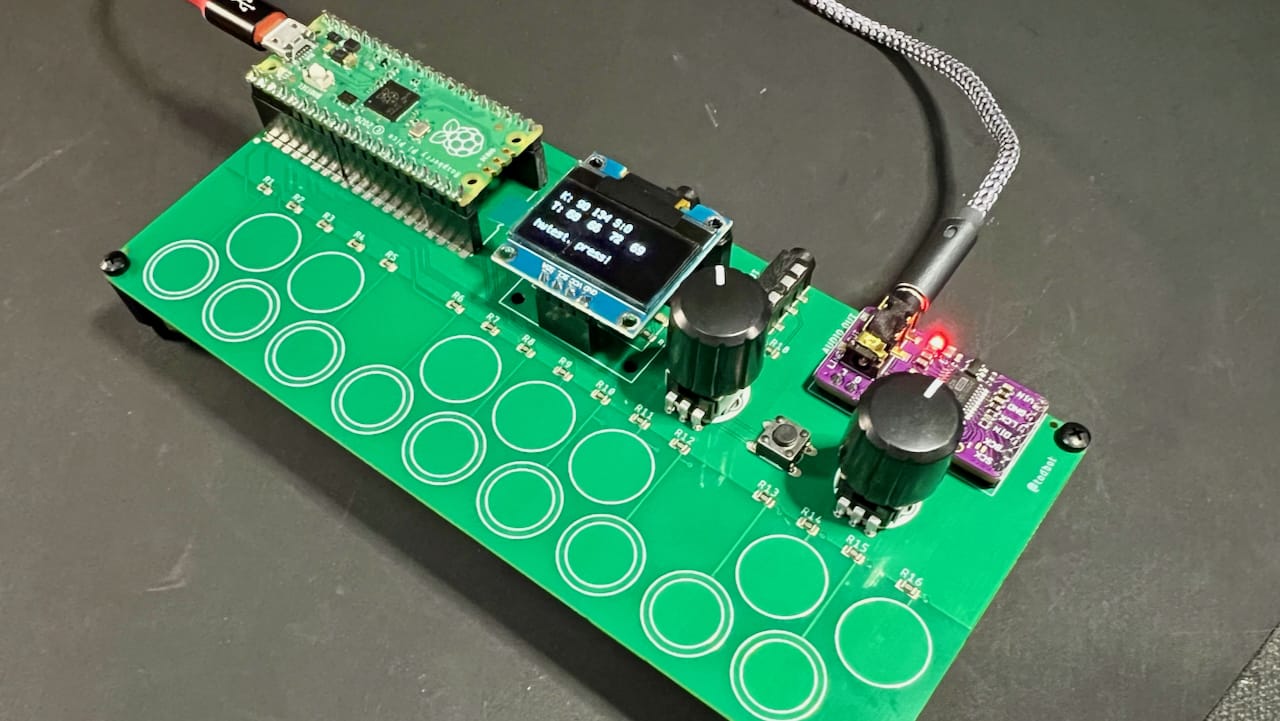
Using the pico_test_synth PCB
You can also use my pico_test_synth PCB to handle all the wiring for you. It includes two knobs, a button, and a PCM5102 I2S DAC, as well as a little I2C OLED display and 16 captouch pads.
Code setup
-
Install CircuitPython for Pico
While most examples work with CircuitPython 9.x, there are some changes to filters and audio effects in CircuitPython 10 that will make it even more fun to use. At the moment CircuitPython 10 is in alpha and doesn’t quite work with
circupthough. This guide will call out when a feature requires CircuitPython 10. -
Installing circup will make adding libraries easier. It’s like “pip” for CircuitPython.
-
Prepare your editor of choice to edit the .py files on your board’s CIRCUITPY drive. You can use any text editor, but some will work better than others with CircuitPython. Some recommendations are:
-
If you prefer to access the CircuitPython REPL via a terminal window, the
tioprogram is highly recommended (Parsec video on tio)
Make a Sound: Hello boop!
Let’s test out the wiring. Create a code.py file
on the CIRCUITPY drive with the contents of the
code_helloboop.py shown below.
This example makes a beep with random pitches every 0.5 seconds.
It uses the square-wave waveform that’s built-in to synthio.
Note that the code below:
- The I2S DAC requires three pins. On the Pico RP2040, the “bit_clock” and “word_select” pins must be adjacent.
- The
Synthesizerrequires a sample_rate (44,100 is “CD-quality”) and a “channel_count”. I2S is stereo, so channel_count=2. - You “plug” the synth into the audio output to allow the synth to be heard.
- To start a sound, use
synth.press(). This takes either a MIDI note number from 0-127 or asynthio.Note().
# 1_getting_started/code_helloboop.py
import time
import random
import board
import synthio
import audiobusio

# how we have our circuit wired up or pico_test_synth
i2s_bck_pin = board.GP20
i2s_lck_pin = board.GP21
i2s_dat_pin = board.GP22

# hook up external stereo I2S audio DAC board
audio = audiobusio.I2SOut(bit_clock=i2s_bck_pin, word_select=i2s_lck_pin, data=i2s_dat_pin)
# make the synthesizer
synth = synthio.Synthesizer(sample_rate=44100, channel_count=2)
# plug synthesizer into audio output
audio.play(synth)

midi_note = 60  # midi note to play, 60 = C4

while True:
    print("boop!")
    synth.press(midi_note) # start note playing
    time.sleep(0.1)
    synth.release(midi_note) # release the note we pressed
    time.sleep(0.4)
    midi_note = random.randint(32,72)   # pick a new random note
Hello Boop reorganized and with buffer
There is an issue with the above code however.
With the synth plugged directly into the audio output, there’s very little buffer
for the CPU to compute samples. It’s also hard to change the overall volume of
the synth. The solution to both issues is to plug an audiomixer
in between.
This means the audio setup goes from this:
audio = audiobusio.I2SOut(bit_clock=i2s_bck_pin, word_select=i2s_lck_pin, data=i2s_dat_pin)
synth = synthio.Synthesizer(sample_rate=44100, channel_count=2)
audio.play(synth)  # plug synth directly into audio output
to this:
audio = audiobusio.I2SOut(bit_clock=i2s_bck_pin, word_select=i2s_lck_pin, data=i2s_dat_pin)
mixer = audiomixer.Mixer(sample_rate=SAMPLE_RATE, channel_count=2, buffer_size=BUFFER_SIZE)
synth = synthio.Synthesizer(sample_rate=SAMPLE_RATE, channel_count=2)
audio.play(mixer)  # plug mixer into the audio output
mixer.voice[0].play(synth)  # plug synth into mixer's first 'voice'
Also, to make it easier to see what’s different each time,
let’s pull out all that setup and put it into a new file called
synth_setup.py.
Our code.py now looks like the below.
We’ll use this technique going forward.
In the example below, the sleep times have been sped up, so you can hear the notes overlapping more.
Also note there’s been a special change at the end of synth_setup.py to make
the boops more appealing. More on that later. (Hint: it’s called an “amplitude envelope”)
# 1_getting_started/code_synth_setup.py
import time, random
# run the setup and get a synth
from synth_setup import synth

midi_note = 60  # midi note to play, 60 = C4

while True:
    print("boop!")
    synth.press(midi_note) # start note playing
    time.sleep(0.1)
    synth.release(midi_note) # release the note we pressed, notice it keeps sounding
    time.sleep(0.3)
    midi_note = random.randint(32,72)   # pick a new random note
Fun with boops
With just the above, we can do some fun.
Generative tunes on a pentatonic scale
This example uses a list of note offsets in a pentatonic scale.
Inside the while-loop, a random note is created from that list and played.
Since the note keeps sounding after the synth.release(), there are some overlap
of the notes, giving us hints of chords. And since this is a pentatonic scale,
just about any combination of two notes sounds good together.
Try changing the root_note or different scales. Some other scales:
scale_major      = (0, 2, 4, 5, 7, 9, 11)
scale_minor      = (0, 2, 3, 5, 7, 8, 10)
scale_dorian     = (0, 2, 3, 5, 7, 9, 10)
scale_phrygian   = (0, 1, 3, 5, 7, 8, 10)
scale_lydian     = (0, 2, 4, 6, 7, 9, 11)
scale_mixolydian = (0, 2, 4, 5, 7, 9, 10)
scale_locrian    = (0, 1, 3, 5, 6, 8, 10)
# 1_getting_started/code_generative_penta.py
import time, random
from synth_setup import synth
root_note = 48
scale_pentatonic = (0, 2, 4, 7, 9, 12, 14, 16, 19, 21)  # two octaves of offsets

while True:
    midi_note = root_note + random.choice(scale_pentatonic)
    print("playing!", midi_note)
    synth.press(midi_note)
    time.sleep(0.1)
    synth.release(midi_note) # release the note we pressed, notice it keeps sounding
    time.sleep(0.1)
And that sounds like:
Play a chord melody
A similar technique lets us play a melody with chords. In this case, we have a list of notes for our melody (the timing between notes is still fixed) and a list of offsets for the block chord to play based on a note.
Let’s also throw in the ability to adjust the melody octave with knobA. (if you don’t have one wired up yet, don’t worry, it’ll still sound cool)
# 1_getting_started/code_chord_melody.py
# part of todbot circuitpython synthio tutorial
# 10 Feb 2025 - @todbot / Tod Kurt
#
import time
from synth_setup import synth, knobA

melody_midi_notes = (50, 55, 57, 59, 59, 59, 57, 59, 55, 55)
chord = [0,4,7]
i=0
while True:
    octave = -1 + int((knobA.value/65535) * 3)  # knobA is octave offset
    midi_note = melody_midi_notes[i] + (octave*12)
    i = (i+1) % len(melody_midi_notes)
    print("playing!", midi_note)
    for n in chord: synth.press(midi_note + n)
    time.sleep(0.05)
    for n in chord: synth.release(midi_note + n)
    time.sleep(0.25)  # play around with this time for slower/faster
Controlling Notes
So far, the code has been triggering notes by itself. But it’s pretty easy to trigger with keypresses or MIDI.
By it’s nature, synthio thinks in terms of synth.press() and synth.release() events.
This makes it easier for us writing code but is different than most synths that
have always-running oscillators feeding into envelopes that are then triggered when a
press event occurs.
Controlling with buttons
Here’s an example with physical buttons.
The pico_test_synth PCB has only one physical button, but with a breadboard,
you can wire up more.
The synth_setup.py file has been updated to have a list of button pins
and the creation of a keypad
“keys” object that does button debouncing and press/release events.
# 1_getting_started/code_buttons.py
import synthio
from synth_setup import synth, keys
root_note = 48  # the lowest note to play

while True:
    if key := keys.events.get():
        midi_note = root_note + key.key_number  # different note for each key
        if key.pressed:
            synth.press(midi_note)
        if key.released:
            synth.release(midi_note)
Controlling with MIDI
MIDI control is very similar, since it also has key press/release events called “noteOn”/”noteOff”. Since USB MIDI is easier to set up (no extra circuitry needed), it’s shown here, but standard 5-pin MIDI over a UART works too.
Instead of using adafruit_midi, the tmidi library
is shown here (available via circup with circup install tmidi and in the CircuitPython Community Bundle).
More details on handling MIDI is in README-5-MIDI.md
# 1_getting_started/code_midi.py
import usb_midi, tmidi
from synth_setup import synth

midi_usb = tmidi.MIDI(midi_in=usb_midi.ports[0], midi_out=usb_midi.ports[1])

while True:
    if msg := midi_usb.receive():
        print("midi:", msg)
        # noteOn must have velocity > 0
        if msg.type == tmidi.NOTE_ON and msg.velocity != 0:
            synth.press(msg.note)
        # some synths do noteOff as noteOn w/ zero velocity
        elif msg.type in (tmidi.NOTE_OFF, tmidi.NOTE_ON) and msg.velocity == 0:
            synth.release(msg.note)
Next steps
Now you can make some sounds and control those sounds with buttons or MIDI, it’s time to start sculpting those sounds. Time for Modulation!